Vanilla is a popular flavor in Uganda, used in both sweet and savory dishes. Vanilla beans are grown in the country, and Ugandan farmers are working to increase production to meet demand. Vanilla is native to Central America, but it was brought to Uganda by European colonists in the 19th century. The climate in Uganda is ideal for growing vanilla, and the country now produces some of the finest vanilla in the world.
Ugandan farmers use traditional methods to grow and harvest their vanilla crops. The beans are hand-pollinated, and they are harvested when they are ripe and dried in the sun. This process results in a rich, flavorful vanilla bean that is perfect for use in baking and other culinary applications. If you’re interested in trying Ugandan vanilla, look for it at your local specialty food store or online. You’ll be able to find it fresh or dried, and it can be used whole or ground into a powder. Add Ugandan vanilla to your favorite recipes and enjoy its unique flavor!van
how to plant vanilla in Uganda
Vanilla is a climbing orchid that is native to Mexico. It is the only edible fruit of the vanilla plant, and its flavor has been described as a cross between cherry and chocolate. The vanilla bean is actually the seed pod of the vanilla plant, and it takes about three years for a vanilla plant to mature enough to produce these pods.
If you want to grow your own vanilla beans, you’ll need to start with a young plant. You can purchase a young plant from a nursery or online retailer specializing in orchids. Once you have your plant, choose a location for it that receives bright indirect sunlight and has well-drained soil. Water your plant regularly, keeping the soil moist but not soggy.
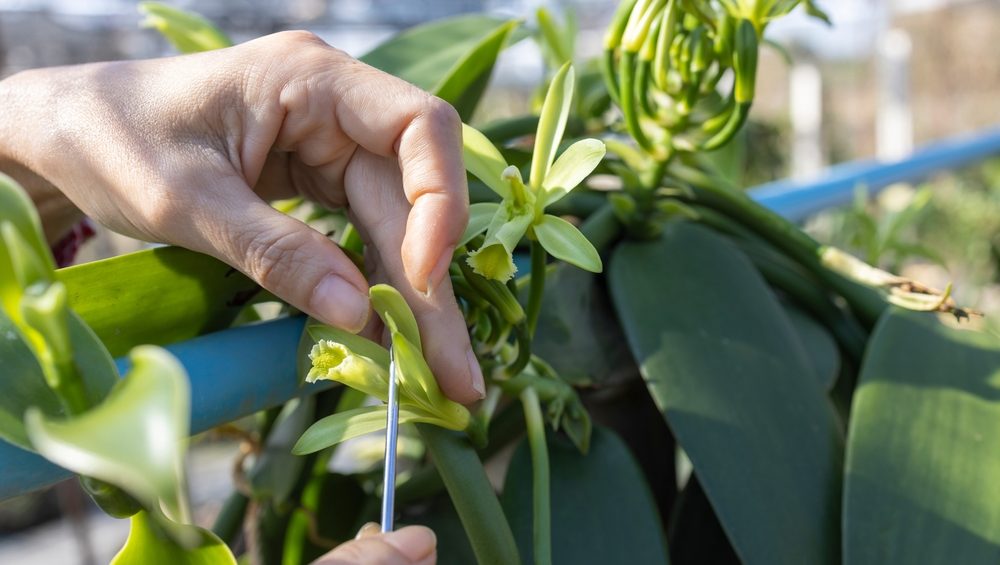
When the vanilla plant blooms, hand-pollinate the flowers with a small paintbrush or cotton swab. This will help ensure that the flowers are fertilized and will produce vanilla beans. Each flower only blooms for one day, so you’ll need to pollinate them as soon as they open.
Once the flowers have been pollinated, they will begin to form seed pods. These pods will mature over several months, and you can harvest them when they are brown and leathery in appearance. To harvest the pods, cut them from the vine with pruning shears and allow them to cure in an air-tight container for several weeks before using them in cooking or baking recipes.”

how to prun vanilla
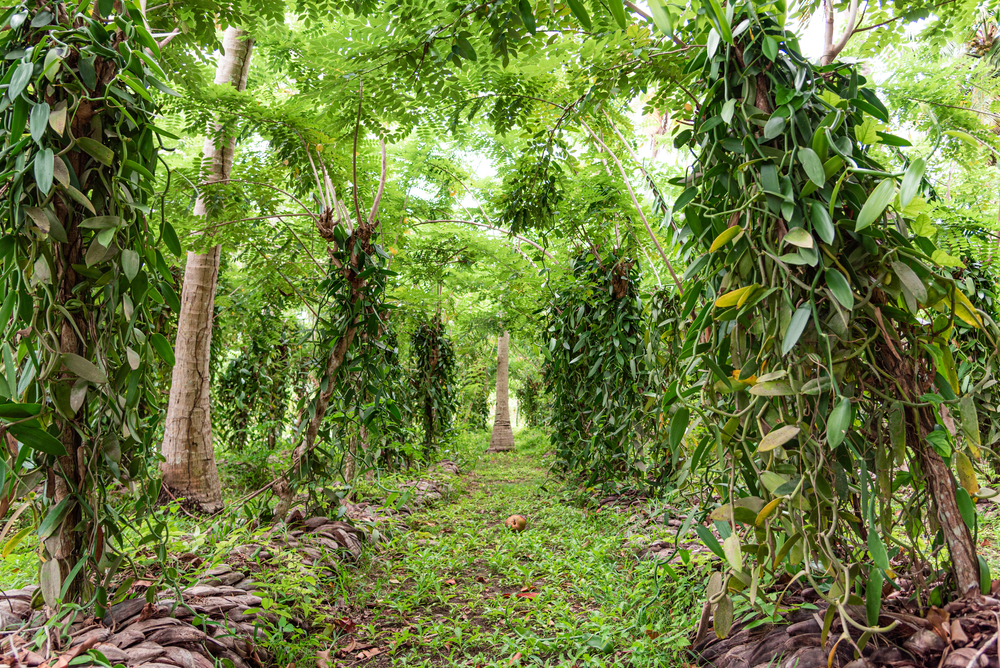
Vanilla is a climbing orchid that can grow up to 30 feet in length. The vanilla bean is actually the seedpod of the vanilla orchid, and it takes about 3-5 years for a vanilla plant to mature enough to produce fruit. Vanilla plants are native to tropical regions of Central and South America, but they can also be grown in greenhouses in other parts of the world.
To harvest vanilla beans, the plant must be carefully pruned so that only the ripe pods are picked. Once picked, the pods are cured in hot water or sun-dried to bring out their flavor. Curing can take several weeks, during which time the beans will turn dark brown and develop their characteristic aroma.
When the curing process is complete, the vanilla beans can be used whole, chopped, or ground into powder. They can be used to flavor a wide variety of foods, including ice cream, pudding, cake, and cookies.
diseases of vanilla
Vanilla is a tropical vine that produces seed pods, or beans. The beans are used to flavor food and beverages. Vanilla is native to Mexico and Central America, and it is now grown in many parts of the world.Vanilla plants can be affected by a number of diseases, including fungal diseases, bacterial diseases, viral diseases, and nematode infections. Some of these diseases can be controlled with chemicals, but others cannot.
Fungal Diseases
One of the most common fungal diseases that affects vanilla plants is black rot. Black rot causes the leaves of the plant to turn black and drop off. The stems may also turn black and become brittle. Black rot can spread quickly and kill a vanilla plant if it is not treated promptly.
Another fungal disease that affects vanilla plants is root rot. Root rot can be caused by several different fungi, including Pythium spp., Rhizoctonia spp., and Fusarium spp. Root rot causes the roots of the plant to decay and die. This can lead to stunted growth or even death of the plant if it is not treated promptly.
Vanilla propagation in Uganda
When it comes to vanilla, there are two main methods of propagation: by seed or by cuttings. Vanilla vines are not self-fertile, so you will need either a male or a hermaphrodite plant in order to produce fruit.
If you are growing vanilla by seed, it is best to start with fresh seeds that have been extracted from the pod. You can also use dried seeds, but these will take longer to germinate. Sow the seeds in a well-draining potting mix and keep them moist but not wet. Place the pot in a warm, sunny spot and wait for the seeds to germinate, which can take anywhere from 2-8 weeks.
Once the seedlings have emerged, transplant them into individual pots filled with a rich, well-draining potting mix. Water regularly and fertilize monthly with a balanced fertilizer. When the plants are around 6 inches tall, they can be transplanted into their permanent home in the garden.
To propagate vanilla by cuttings, take 6-8 inch cuttings from healthy vines that are at least 1 year old. Cut just below a leaf node and remove all but the top two leaves. Dip the cut end of the cutting into rooting hormone and plant it in a well-draining potting mix. Keep the cutting moist but not wet and place it in a warm, sunny spot until roots have developed (this can take 4
-6 weeks). When the roots are well-developed, transplant the cutting to its permanent spot. To propagate vanilla by seed, start with fresh, plump beans. Plant the beans in well-draining potting mix and keep them moist but not wet. Place the pots in a warm, sunny spot and wait for the seeds to germinate (this can take 2-3 months). When the seedlings are 6-8 inches tall, transplant them to their permanent spot.
Vanilla Harvesting In Uganda
Harvesting vanilla is a tricky process, but it’s worth it for the delicious flavor of the beans. Here’s what you need to know to harvest your own vanilla.
The first step is to find a ripe vanilla bean. The bean should be dark brown and slightly soft to the touch. If it is too hard, it will be difficult to harvest; if it is too soft, the bean will be mushy and difficult to use.
Once you’ve found a ripe bean, cut it from the vine using a sharp knife. Be careful not to damage the bean; if you do, it will be unusable.
Next, split the bean open lengthwise using your knife. You should now see a dark brown pulp inside the bean; this is what gives vanilla its flavor.
Now comes the tricky part: extracting the pulp from thebean without damaging it. The best way to do this is to use your fingers; gently squeeze and twist the bean until the pulp comes out in one piece. If you’re having trouble, you can also try using a spoon or other blunt object to help extract the pulp.
Once you have extracted all of the pulp from the bean, you can discardthe empty shell. The pulp can be used immediately or stored in an airtight container for later use.
Vanilla Drying and Fermentation

Vanilla is a popular flavor used in many desserts and baking recipes, but did you know that it can also be used to make savory dishes? Vanilla has a unique flavor that can enhance the taste of many foods, and it can also be used to add fragrance to your home.
If you’re interested in growing vanilla, you’ll need to start by drying and fermenting the beans. This process can take several weeks, but it’s necessary in order to develop the flavor of the vanilla. Once the beans are dried and fermented, they can be used in a variety of ways.
Drying vanilla beans is relatively simple. You’ll need to place them on a screen or rack so that they can dry evenly. Be sure to turn them regularly so that they don’t mold or rot. The drying process will take several weeks, but once the beans are completely dry, they can be stored in an airtight container for future use.
Fermenting vanilla beans is a bit more complicated than drying them. You’ll need to place the beans in an airtight container with some water and sugar. The ratio of water to sugar should be about 1:1. Then, you’ll need to add a bit of yeast to the mixture and seal the container tightly.
The fermentation process will take about two weeks, during which time the mixture should be stirred occasionally. After two weeks, the mixture should be strained and the vanilla bean pods should be rinsed.
Comments are closed