
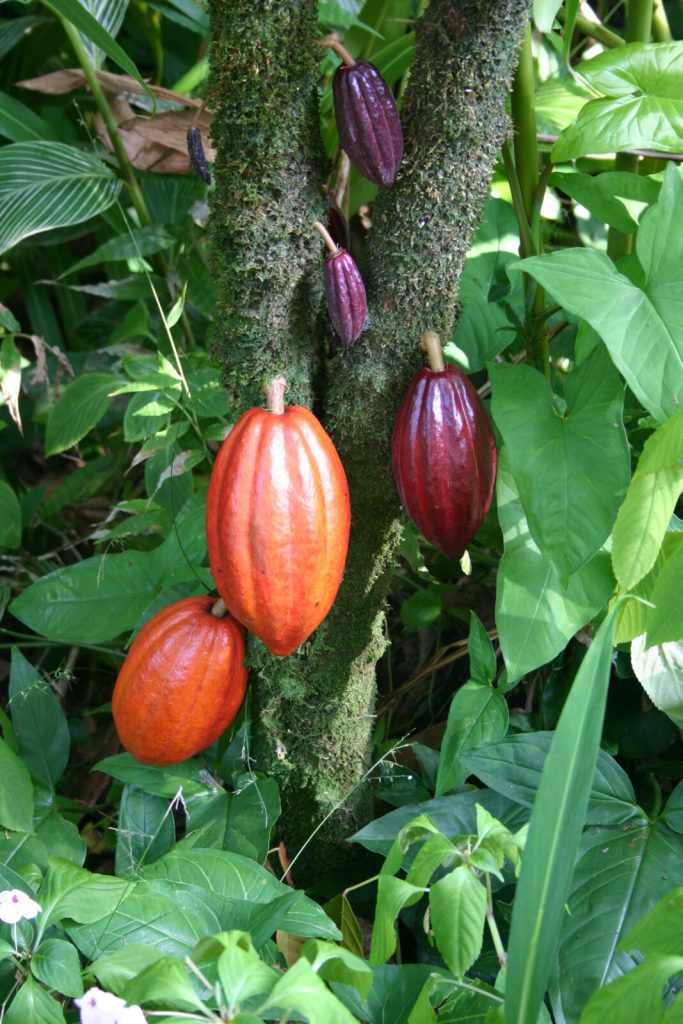
Cocoa harvesting and fermentation happen inside about two weeks, and those two weeks decide what the crop is worth. You cut ripe pods, hold them a few days, break them without cutting the beans, ferment the wet beans for four to six days, then dry them slowly to about 7 percent moisture. Everything the tree did over five months is settled in that window.
Cut a properly fermented bean in half and it is brown throughout. Cut a badly fermented one and it is purple, or grey. Nothing that goes wrong later can fix a purple bean, and nothing you did in the garden shows up in the price if the ferment failed. This page runs through the week in the order it happens.
When Cocoa Pods Are Ready to Harvest
A pod takes about five to six months from pollination to maturity, and pods on one tree do not ripen together. So harvesting is a repeated walk through the garden rather than a single event. Uganda has two harvests: the main crop from September to March and a mid crop from May to August.
Ripe pods turn yellow or orange, and purple on some types, so colour is the first signal and firmness the second. Unripe pods give bitter, low quality beans. The interval between passes is disputed and the reason is worth knowing. The ministry's manual says harvest every two to three weeks. International reference practice says every seven to ten days. The wider interval is what smallholder labour allows; the shorter one loses fewer pods to rot, birds and rodents. If you can only manage one pass a fortnight, walk the wettest, most shaded corners first, because that is where black pod is working.
There is a little room to be late but not much. Beans stay in good condition inside an attached ripe pod for around two to three weeks. Past that, they start germinating in the pod, and a germinated bean is a defect a buyer counts.
Cutting Cocoa Pods Without Damaging Next Season's Yield
Pods grow straight off the trunk and the older branches, from swollen points called flower cushions. Those cushions produce again, season after season. Damage one and you have removed a bearing site from a tree you expect to work for thirty years.
So cut cleanly through the stalk and leave the cushion alone. A machete works low down; for pods high on the tree, a pruning hook on a long pole lets you cut through the stalk by pushing or pulling without tearing the branch. A purpose made cocoa harvesting knife makes a cleaner cut than a panga. Whatever the tool, the cut is through the stalk and not into the bark.
Collect into baskets rather than heaping pods on the ground, to keep them from bruising. Gather the healthy pods to one clean breaking point. Diseased and damaged pods go on a separate route and never into the collection basket, because a single rotten pod broken with the rest contaminates the whole wet bean mass before fermentation has even started.
How Long to Hold Harvested Cocoa Pods Before Breaking Them
This is the step most often skipped and the sources genuinely differ, so here is both readings and what closes the gap.
Uganda's manual says ripe pods may be broken two to three days after harvesting, and gives the purpose: it reduces the pulp juice content and improves the quality of the fermented beans. Too much pulp interferes with aeration of the fermenting mass and pushes bean acidity up, which is exactly the fault you taste later. International reference practice describes pods being opened within a week to ten days of harvest, which is a wider window.
What closes the window is germination and mould. An over ripe pod produces beans that sprout, and a pod held too long in wet weather starts rotting from the inside. So treat two to three days as the Ugandan instruction and a week as the outer limit, and shorten it in a wet season rather than lengthening it. Pulp is also wetter in the rains, which is why the same heap ferments differently in March than in July.
Breaking Cocoa Pods at Harvest and Removing the Wet Beans
Use a blunt cutlass, a wooden club, or knock one pod against another. A club striking the middle of a pod splits it into two halves and the wet beans scoop out by hand.
Never use a sharp cutlass or machete, and the reason is worth stating in full because it explains a defect you cannot see. A sharp blade cuts into the beans inside the pod. Cut beans let micro organisms in, and that raises the risk of ochratoxin A forming, which is one of the two toxins importing markets set limits on. So the blunt tool is not carelessness made acceptable. It is the tool that protects the beans, and the sharp one is the mistake.
Keep the breaking area clean. Beans go straight into a clean container and never into a rusty one. Discard the husk, the placenta, and any germinated, discoloured, diseased, broken, flattened or caked beans, and keep them well away from the good ones. Sorting at this point is free; sorting after drying costs you a day.
Pod husks belong back in the garden. Spread them where they were broken and they return nutrients, hold moisture and suppress weeds, and the scale of that is worth grasping.
Fermenting Cocoa Beans: Heap, Basket and Box Methods on the Farm
Fermentation is not flavouring, it is a controlled death. Yeasts on the pulp turn sugars into alcohol, bacteria oxidise that alcohol into acetic acid, and the heat and acid together kill the bean by about the second day. Once the bean is dead its cell walls break down, compounds that were kept apart mix, and the chocolate flavour precursors and the brown colour form. Pulp drains away, the skin loosens from the kernel, and the moisture content starts falling. A heap that never warms up has not fermented.
Temperature climbs to around 40 to 45 degrees during the first 48 hours and then holds while the pulp drains and air gets in. Turning is what supplies the air, and turning is the one thing every method has in common.
The box methods buy you drainage, a cleaner mass and a measurable routine. The heap costs nothing and works, provided it is big enough to hold heat and provided somebody turns it on schedule. What kills a heap is being too small, sitting in the open, or being left alone for four days because the person who turns it travelled.
Use untreated, unpainted wood. Anything that can leach into the mass will, and cocoa picks up flavours readily.
How Long Cocoa Fermentation Takes on a Smallholder Farm
Published durations run from two days to ten, which looks like chaos until you see what decides it. Uganda's manual gives four to six days in its prose and names the factors: method, weather and variety. Its storey box runs seven days. Its single box finishes by five.
The deciding condition is the morphological group, and two international sources agree on it. Criollo and Trinitario beans need two to four days. Forastero needs four to six. International reference practice puts it at about five days for Forastero and two to three for Criollo. Criollo pods are thin skinned with large, almost round, pale beans; Forastero pods are thick and hard with flat dark purple beans; Trinitario is the hybrid between them and varies. Most African plantings are built on Forastero and Trinitario material, so four to six days is the realistic planning figure, with the caveat that mixed hybrid material behaves in between.
Weather moves it too. Pulp and beans hold more water in the wet season, which slows the mass down and pushes acidity up. Do not run a calendar. Run the cut test.
The Cut Test: What Bean Colour Tells You About Market Quality
Take a sample of beans, cut each one in half lengthwise, and look at the colour of the kernel. That is the whole test, it needs no equipment, and it is the only way to know when the ferment is done.
| Cut colour | Fermentation | Flavour on roasting |
|---|---|---|
| Brown | Full | Strong cocoa, balanced bitterness |
| Brown and purple | Partial | Good cocoa, more astringent |
| Purple | Low | Weak cocoa, strongly bitter |
| Greyish or black | None | No cocoa flavour, sour |
Run the test on the fermenting mass to decide when to stop, and again on the dried beans, because a buyer will run it on your lot and price from it. The defect counts they take from the same cut are what set your grade.
Under fermenting is the common fault and it happens for an ordinary reason: the beans look finished on the outside well before they are finished inside. Over fermenting is possible too and it shows as off flavours rather than as colour. Cut, look, decide.
Drying Cocoa Beans to the Right Moisture
Beans come out of the ferment at around 55 to 60 percent moisture and have to reach about 7 percent. Four published targets exist and they do not agree: Uganda's manual says 7 to 8 percent in its post harvest chapter and 6 to 7 percent at sale in its marketing chapter, the crop monograph literature says 6 to 7, and international reference practice says about 7.5.
The instruction that clears every one of those, and errs on the dry side where mould is the risk, is to dry to about 7 percent and no higher. Measure it with a calibrated moisture meter on a representative sample rather than by feel. The fist test, where properly dried beans make a cracking sound when pressed lightly in the hand, is a useful check that you are close, not a substitute for the meter. The same sampling discipline applies to any stored crop and the moisture management guide sets out how to take a sample that represents the lot.
Drying rate matters as much as the endpoint, and it cuts both ways. Too fast, and the acid reactions started during fermentation never finish, so the bean stays acidic and bitter. Too slow, and moulds and off flavours develop. Bean temperature should not go above 65 degrees. Sun or solar drying gives the best quality, spread in thin layers on raised clean beds, turned every two to three hours, and protected from rain and from overnight humidity. A tarpaulin you can pull over in ten minutes is worth having before the rains, not during them.
Sorting and Grading Cocoa Beans for Buyers
Grading turns on two things: how many beans make up a hundred grams, and how many defective beans turn up in the cut test. Both are measurable and both are in your control by the time the lot is dry.
Uganda's manual sets grade 1 at under 3 percent each of slaty, mouldy and defective beans, and grade 2 at under 5, 4 and 5 percent respectively. Lower grades are whatever the buyer's specification says. On size it asks for at least 1.0 gram per bean, which is the same statement as no more than 100 beans per 100 grams, and it explains why: beans under that weight carry proportionally more shell and yield less kernel, so a processor gets less out of the same tonnage.
Sort out flat, slaty, mouldy, insect damaged and black beans, along with twigs, stones, soil and any debris. Size grade into large, medium and small so the lot roasts evenly, using sieves if you have them and a table with good light if you do not. Keep a record of volumes by grade and defect rates, because that is the only way to know whether last season's changes worked. The sales record template gives you somewhere to log it against the price you actually got.
Uniformity is the thing buyers are really paying for. A lot of even size, even colour and even fermentation tells them the whole consignment will behave the same way, and a mixed lot gets priced at its worst part.
Storage of Dried Cocoa Beans on the Farm
Pack in jute or sisal sacks of non toxic material, or food grade polylined sacks where dryness is the bigger risk. Then four rules from the manual, all of them about air and contamination.
Stack the bags on wooden pallets at least 7 cm above the ground so air circulates underneath. Leave at least 60 cm of passage between the bags and the walls, and between lots of different types. Check the moisture content of each lot periodically rather than once at bagging, because a lot that was dry in a dry week can pick moisture back up. And keep the store clear of paraffin, fuel, agrochemicals and kitchen smoke, because beans absorb smells and a tainted lot cannot be untainted.
Label each lot with a trace code, net weight, harvest date and the farmer or group name. That is what a buyer needs to trace a consignment, and it is also what lets you find out which of your own lots earned what. Sack choice and labelling are covered more fully in the packaging guide.
Where Cocoa Fermentation and Drying Go Wrong
Ugandan research has now measured what happens when the post harvest week goes badly, and it is the strongest argument for doing it properly.
A study that sampled 270 lots of fermented and dried beans from farmers in Mukono, Bundibugyo and Hoima, districts it says carry over 80 percent of national production, found 77 percent carried one or more aflatoxin, with 8.5 percent of samples above the 10 microgram per kilogramme limit the authors measured against. Ochratoxin A was found in 53 percent of samples, none above 10 micrograms, but 17 percent sat above the 3 microgram European threshold for cocoa powder. This is a preprint and has not been through peer review, so read it as a first measurement rather than a settled figure.
Two things in it matter for practice. First, the pattern differed by zone: aflatoxin was highest in the Lake Albert crescent, ochratoxin A highest in the Lake Victoria crescent, and both were lowest in the western rangelands. Drying conditions differ across those zones, and so does the risk. Second, the researchers had to benchmark against Brazilian and European limits because Uganda has no maximum limit for these toxins in cocoa. That is not reassurance. It means the limit that will be applied to your beans is the importing market's, and it will be applied after you have been paid or instead of being paid.
Which is what the drying rules are for. A blunt breaking tool keeps beans uncut so micro organisms cannot get in. Thin layers turned every few hours dry the inside, not just the surface. Raised beds keep soil off. A tarpaulin stops a rained on lot sitting wet overnight. None of that costs money, and all of it is the difference between a lot that ships and a lot that is rejected somewhere you will never see.
Questions About Harvesting and Fermenting Cocoa
How do I know a cocoa pod is ripe? Colour first, from green or red to yellow or orange, and purple on some types, then firmness. Pods take about five to six months from pollination, so if you noted when a flush set you can predict it. Unripe pods give bitter, low quality beans and there is no recovering them later.
Can I skip fermentation and just dry the beans? You can and the beans will keep, but they will cut purple or grey, carry no cocoa flavour and taste sour on roasting. That is a different product sold at a different price. Ask your buyer what they pay for unfermented beans before assuming the saving is real, because in some producing countries the discount has been small enough that farmers stopped bothering, and in others it is heavy.
Is a fermentation box worth building? It buys drainage, a cleaner mass, a repeatable routine and a finish by about day five in the single box design. Against that, a heap under banana leaves costs nothing and works when it is turned on time. The ministry's own four year budget for an acre allows a lump sum of 100,000 shillings for fermentation and 150,000 for drying, which is a planning figure in a manual rather than a quotation, so price the timber locally. If the reason your ferments fail is that nobody turns them, a box will not fix that.
How many days should fermentation take? Four to six days for the Forastero and Trinitario type material most African plantings are built on, two to four for Criollo. Weather moves it, wet season pulp slows it, and the cut test settles it.
Why must I not use a sharp machete to open pods? Because it cuts the beans inside. Cut beans admit micro organisms, and that raises the risk of ochratoxin A forming in the lot, which is one of the toxins importing markets set limits on. A blunt cutlass, a wooden club or one pod against another does the job without the damage.
How long can I leave ripe pods on the tree? Beans stay in good condition in an attached ripe pod for around two to three weeks, but after that they begin germinating inside it, and a germinated bean is a counted defect.
What moisture should dried cocoa beans reach? Aim for about 7 percent and no higher. That figure clears every published target, from 6 to 7 percent through to about 7.5, and it errs toward dry, which is the safe direction. Use a calibrated meter on a representative sample; the cracking sound in the fist is a check, not a measurement.
Can I dry cocoa beans on a tarpaulin on the ground? A tarpaulin keeps soil and stones out, which is the main thing bare ground does wrong, and it lets you cover the lot when rain comes. A raised bed is better, because air moves underneath and the beans dry from both sides. Neither replaces turning every two to three hours.
Checking What Buyers Pay for Properly Fermented Cocoa
The grade you deliver is the price you get, and grade is decided by the cut test, the defect count, the bean size and the moisture reading. So before your first harvest, ask two or three buyers the same three questions: what moisture they hold you to, what defect percentages they price at each grade, and what they actually pay for the grade you are likely to produce rather than for grade 1. Then dry to their number and cut a sample yourself before you present the lot.
From here, the cocoa farming guide covers the garden and the shade management that decides how many sound pods you get to harvest, the seedling guide covers the planting material, and export basics explains what sits between a farm store and a shipment. If you are weighing cocoa against other perennials on the same land, the export crop guides and the coffee processing comparison are the places to start.